OneSpan Sign for New Users: How to Create and Send Your First Package (Java SDK)

My first couple blogs covered creating, sending, signing, archiving, and viewing the evidence summary of an OneSpan Sign Document Package, using the UI. With that complete, it’s now time to step into the APIs. My main language of use over the past 7+ years and from school was Java, so I will start with the Java SDK.
If you do not have a Sandbox account, please see my first blog. Otherwise, continue on, below.
Requirements
First, we will cover a few requirements for following along with this blog.
Downloading the Java SDK
Before we can use the Java SDK, you will need to download it. At the following link you will find links to the Java SDK download, the Java SDK JavaDoc, and the GitHub Java Examples. You will also see downloads and info for the .NET SDK and Mobile SDK.
Downloading a Java IDE
I will be using the Eclipse IDE in this blog. You can use another, but everything in this blog will be described using Eclipse. Below is a link to download Eclipse. I am using the "Eclipse for Java and Report Developers" because I use it for the BIRT report tool, later in this example.
Go ahead and install Eclipse by unzipping the zip file to your preferred location. I chose "C:/Eclipse/".
Create and Send a Package
Now that we have all of the essentials for completing the tutorial, we can go ahead and get started.
Create and Configure a Java Project
Open Eclipse by running eclipse.exe from the root "eclipse" folder. Once it has started up: if it is not already open, open the Java perspective. You can do this by going to Window -> Open Perspective -> Other… -> Java.
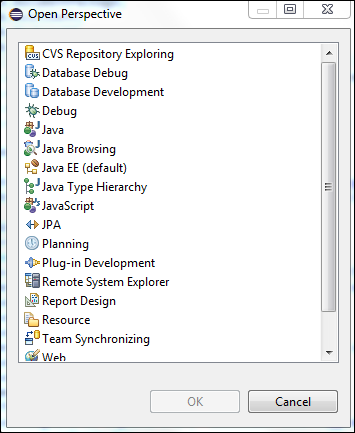
Once you have the Java perspective open, you should see a View called the "Package Explorer" on the left side of the screen. Right-click inside this window and go to New -> Java Project. That will open a window like the one below:
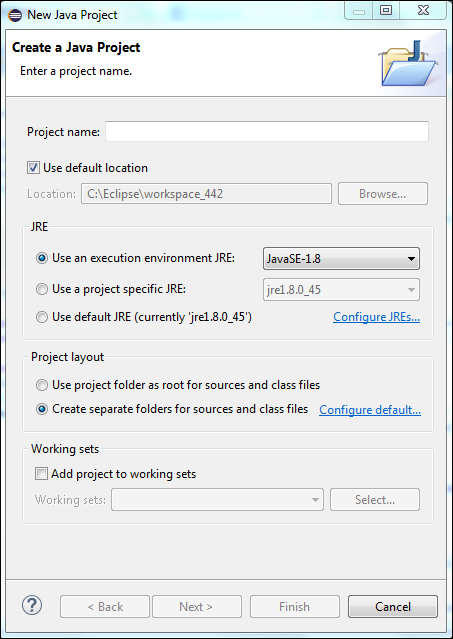
Name your project whatever you would like. I used, "CreateAndSendPackage". Then, hit next.
Choose the Libraries tab, click the "Add External JARs…" button, navigate to the location that you saved your SDK to, and select the "sdk--jar-with-dependencies" jar. After you select "Open", you will see that the SDK jar has been added to your build path.
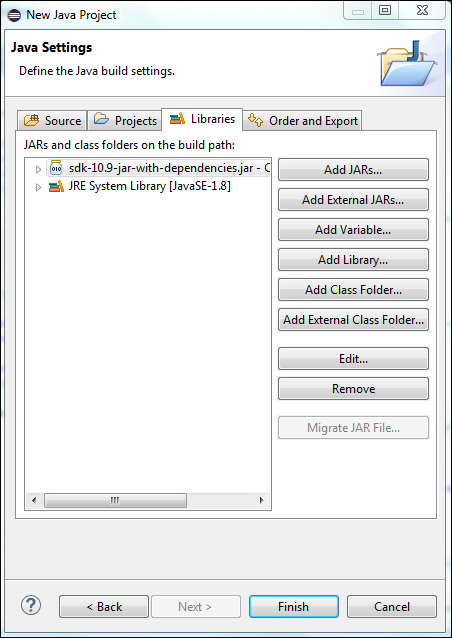
Select Finish.
Your new project has now been added to your Package Explorer view.
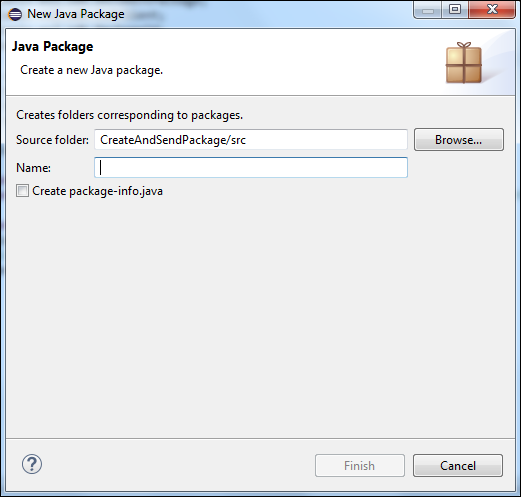
Expand the package by clicking on the arrow to the left, right click on the "src" folder and go to New -> Package. Enter what you want for the package name. I entered "com.esignlive.example". Select Finish.

Right-click on your new package in the Package Explorer and go to New -> File to create a new java file. Enter a name for the file. I named the file, "SimpleCreateAndSendPackage.java". Select Finish.
Finally, add a sample PDF file that you want to have signed to your project with a simple copy and paste from your file system into your project in the package explorer. I used BIRT (Eclipse reporting project) to create the sample agreement PDF that is used in this blog.
This completes the setup and configuration. Your project should now look like this:
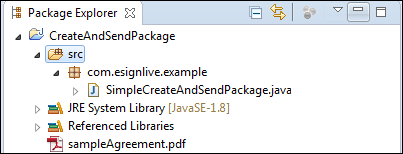
You are now ready to write the code in your Java class.
The Code
Open up your "SimpleCreateAndSendPackage.java" file in Eclipse. Copy the below code into the file editor. We will discuss the code in more detail, further down.
package com.esignlive.example;

import com.silanis.esl.sdk.DocumentPackage;
import com.silanis.esl.sdk.EslClient;
import com.silanis.esl.sdk.PackageId;
import com.silanis.esl.sdk.SessionToken;

import static com.silanis.esl.sdk.builder.DocumentBuilder.newDocumentWithName;
import static com.silanis.esl.sdk.builder.PackageBuilder.newPackageNamed;
import static com.silanis.esl.sdk.builder.SignatureBuilder.signatureFor;
import static com.silanis.esl.sdk.builder.SignerBuilder.newSignerWithEmail;

public class SimpleCreateAndSendPackage {

    public static final String API_KEY = "";
    public static final String API_URL = "https://sandbox.esignlive.com/api";
    // USE https://apps.e-signlive.com/api FOR PRODUCTION

    public static void main( String[] args ) {
        EslClient eslClient = new EslClient( API_KEY, API_URL );
        // Build the DocumentPackage object
        DocumentPackage documentPackage = newPackageNamed( "Test Package API" )
                .withSigner( newSignerWithEmail( "[email protected]" )
                        .withCustomId( "Signer" )
                        .withFirstName( "SignerFirstName" )
                        .withLastName( "SignerLastName" ) )
                .withSigner( newSignerWithEmail( "[email protected]" )
                        .withFirstName( "YourFirstName" )
                        .withLastName( "YourLastName" ) )
                .withDocument( newDocumentWithName( "sampleAgreement" )
                        .fromFile( "sampleAgreement.pdf" )
                        .withSignature( signatureFor( "[email protected]" )
                                .onPage( 0 )
                                .atPosition( 175, 165 ) )
                        .withSignature( signatureFor( "[email protected]")
                        		.onPage( 0 )
                        		.atPosition( 550, 165 )))
                .build();

        // Issue the request to the OneSpan Sign server to create the DocumentPackage
        PackageId packageId = eslClient.createPackage( documentPackage );

        // Send the package to be signed by the participants
        eslClient.sendPackage( packageId );
    }
}
You will see in the first line of the class that you will need your API key. To find this, log in to your OneSpan Sign account and click on "ACCOUNT" from the top menu. Your API Key is listed there. By default, the value is hidden. Select "Unlock" to show the value. Now, replace with your API key value.
The next line is the API_URL. If you’re using the Sandbox, like I am, the correct URL is already in place. If in production, you should use the commented out URL.
Because this is a very basic example, the rest of the code is also within the main method.
EslClient eslClient = new EslClient( API_KEY, API_URL );
The above line of code creates our OneSpan Sign Client using your OneSpan Sign account's API Key and the appropriate API URL that you defined above.
The next block of code is where you actually create the document package. Within this block, you give your package a name.
DocumentPackage documentPackage = newPackageNamed( "Test Package API" )
Next, two signers are added to the package. One being yourself and the other being the person you will send the package to for signature. In this block, you will replace the email addresses and names with your test info.
.withSigner( newSignerWithEmail( "[email protected]" )
        .withCustomId( "Signer" )
        .withFirstName( "SignerFirstName" )
        .withLastName( "SignerLastName" ) )
.withSigner( newSignerWithEmail( "[email protected]" )
        .withFirstName( "YourFirstName" )
        .withLastName( "YourLastName" ) )
We add our document to be signed and also place the signature blocks for our signers. Again, remember to replace the sample values in this block with your test info.
.withDocument( newDocumentWithName( "sampleAgreement" )
        .fromFile( "sampleAgreement.pdf" )
        .withSignature( signatureFor( "[email protected]" )
                .onPage( 0 )
                .atPosition( 175, 165 ) )
        .withSignature( signatureFor( "[email protected]")
                .onPage( 0 )
                .atPosition( 550, 165 )))
Finally, we build our package.
.build();
Now that the document package object is ready, we can access our OneSpan Sign Client, create our package, and send it to the signers.
// Issue the request to the OneSpan Sign server to create the DocumentPackage
PackageId packageId = eslClient.createPackage( documentPackage );

// Send the package to be signed by the participants
eslClient.sendPackage( packageId );
Running the Code
With your Java class completed, you can go ahead and execute your simple application. There are a few ways you can do this from Eclipse. In the toolbar, you can select the run button, you can select Run -> Run from the menu bar, or you can right click on your Java class in the Package Explorer and choose Run As -> Java Application.
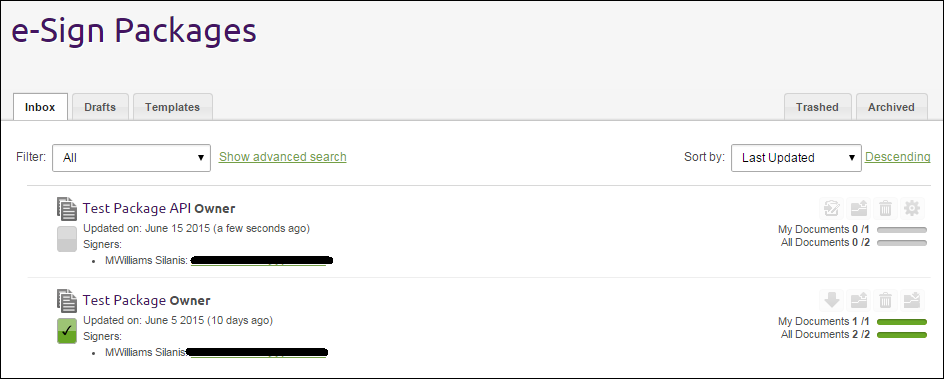
Congratulations! You have now created and sent a package with the Java SDK. If you go check our OneSpan Sign Sandbox account inbox, you will see that the package has been created and waiting for signature.
Thanks for reading! If you have questions, feel free to post questions in the comments section. Next time, I will continue on with what happens next with this package, like, showing how to check the status of a package and downloading the completed package. If you want to jump ahead and play around with the APIs a bit more, take a look at the documentation and available examples. You will find links at the location we downloaded the SDK, above. Links to all of the posts from this blog series can be found, below.
– Michael Williams
Twitter | Facebook | LinkedIn
OneSpan Sign for New Users Blog Series
- Create and Send a Package Using the UI
- You Sent a Package, What Now? (UI)
- Create and Send a Package with the Java SDK
- Check Package Status and Download Files with the Java SDK
- Create and Send a Package with the .NET SDK
- Check Package Status and Download Files with the .NET SDK
- Create and Send a Package using REST with C#
- Check Package Status and Download Files using REST with C#
- Create and Send a Package using REST with Java
- Check Package Status and Download Files using REST with Java

